Input Sheet Overview
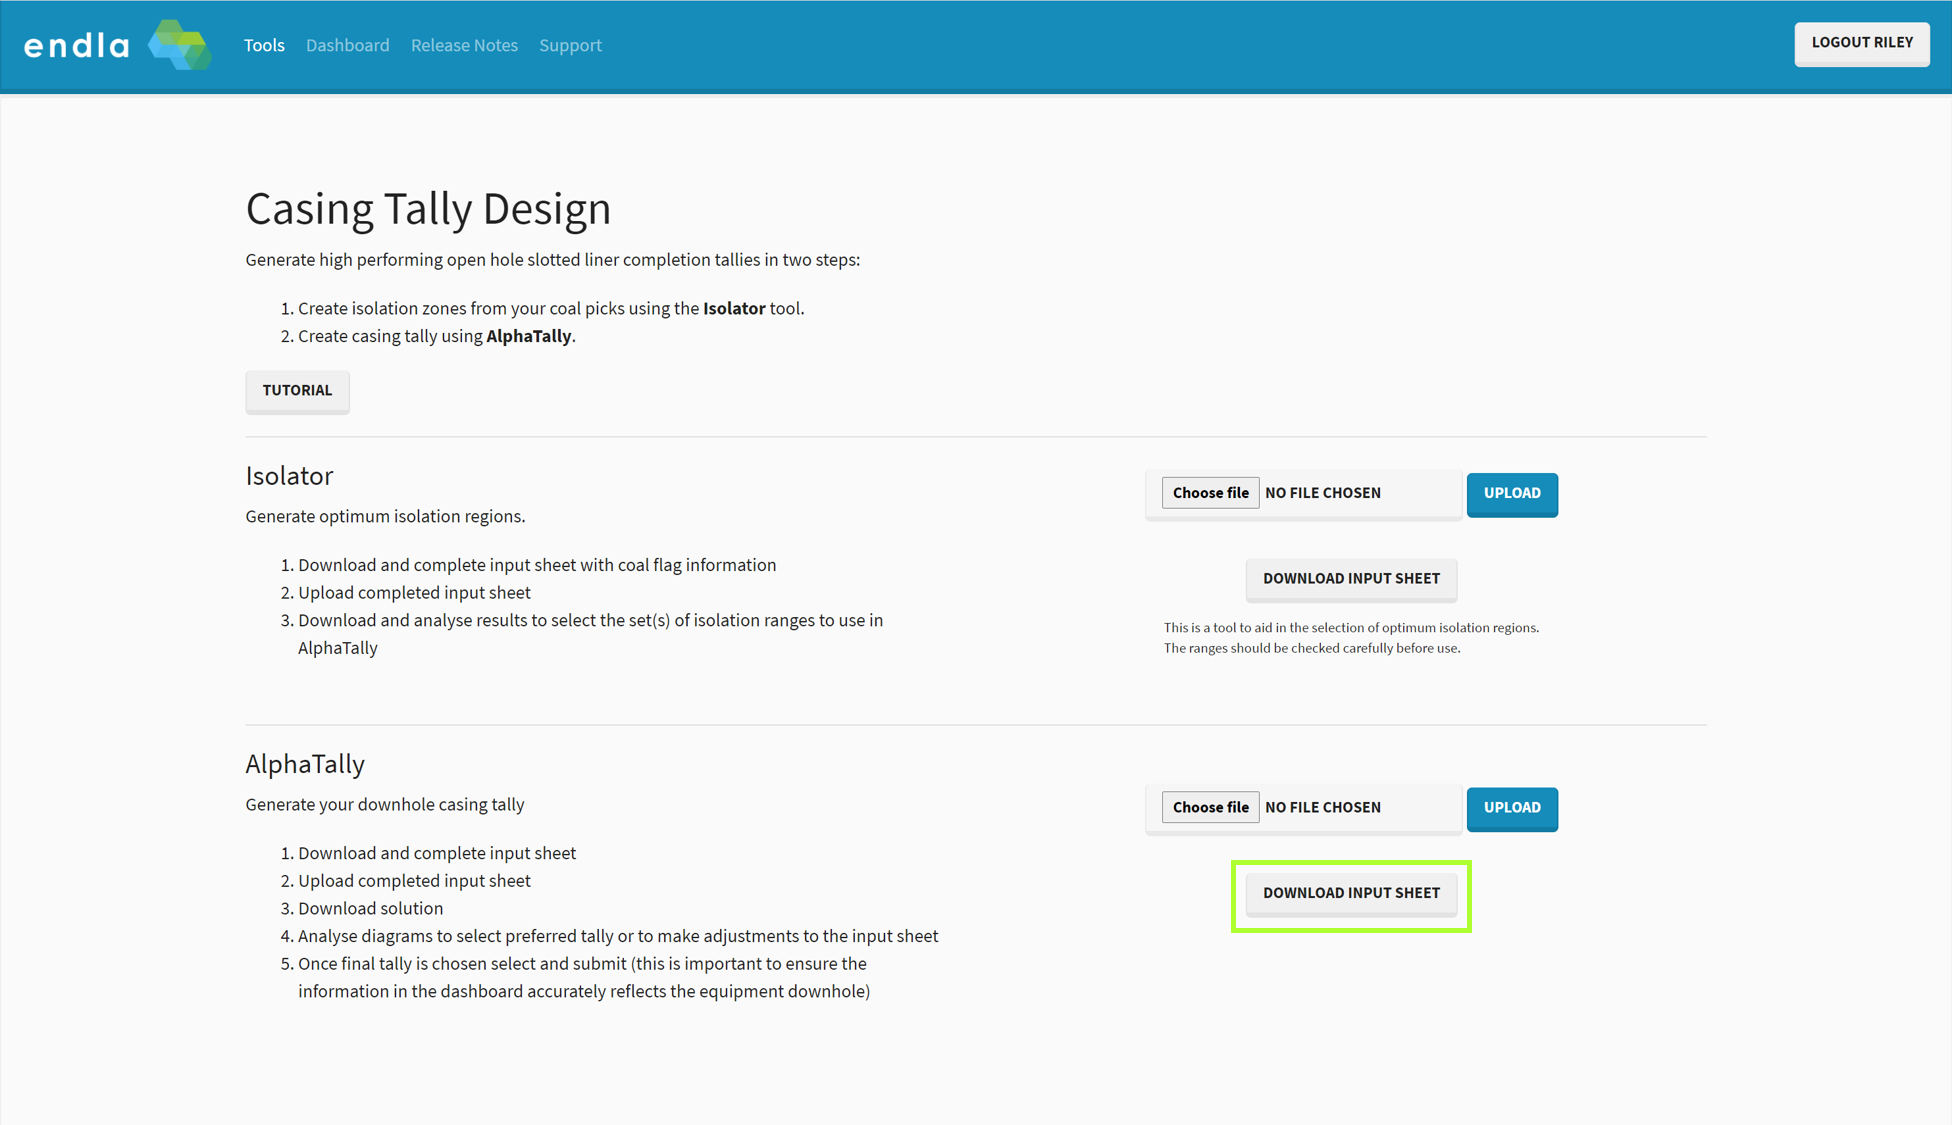
The first step is to log into alphatally.endla.com.au and download the required input sheets.
Once the AlphaTally input sheet has been downloaded and opened the following tabs will be seen.
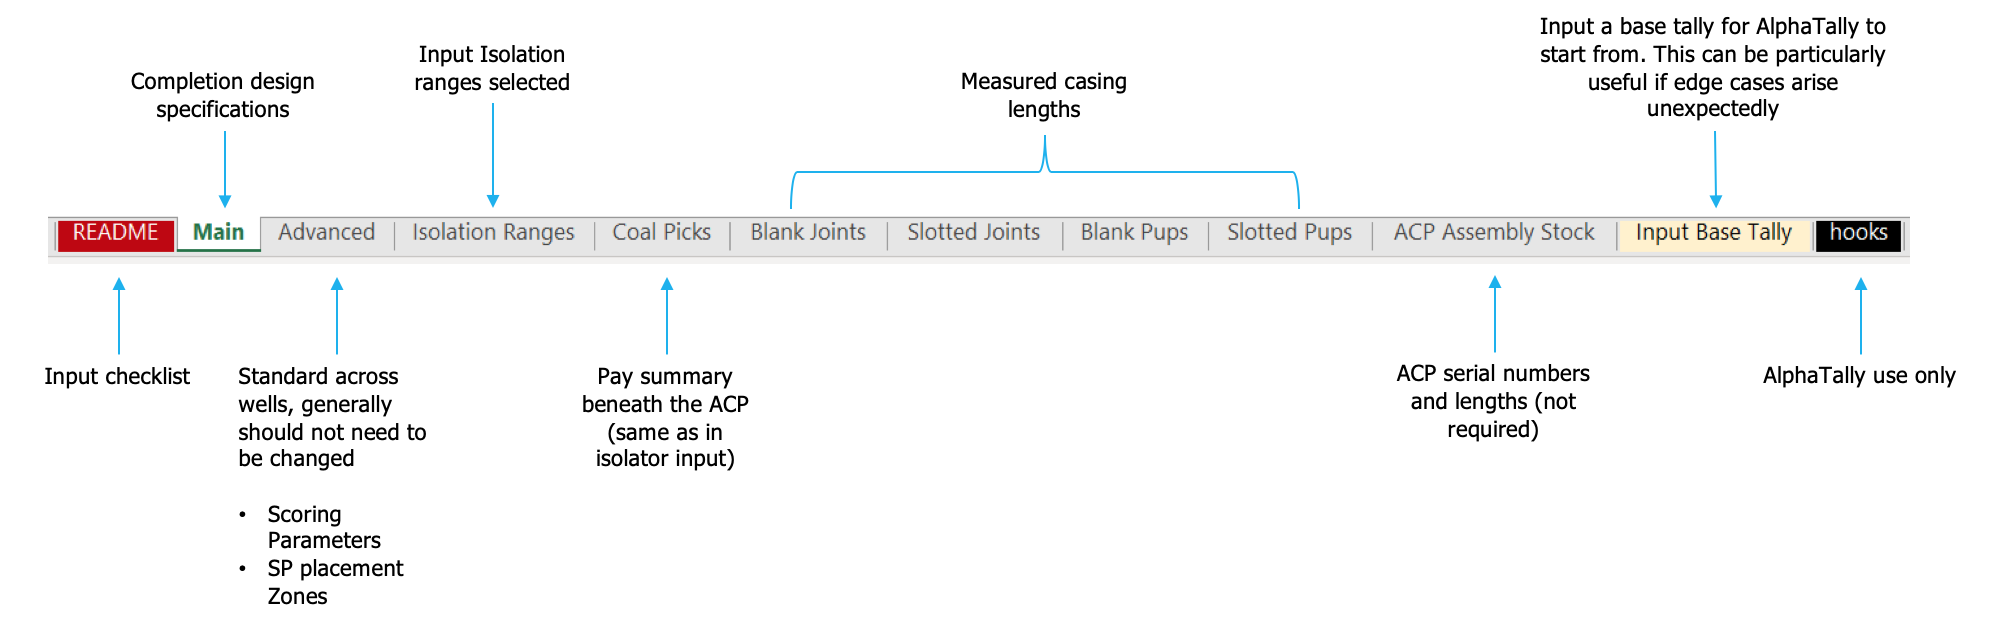
The first sheet, README, provides a key to the cell colour coding in the spreadsheet and also an input checklist which can indicate if your data is ready to be input to AlphaTally.
Completion Specifications
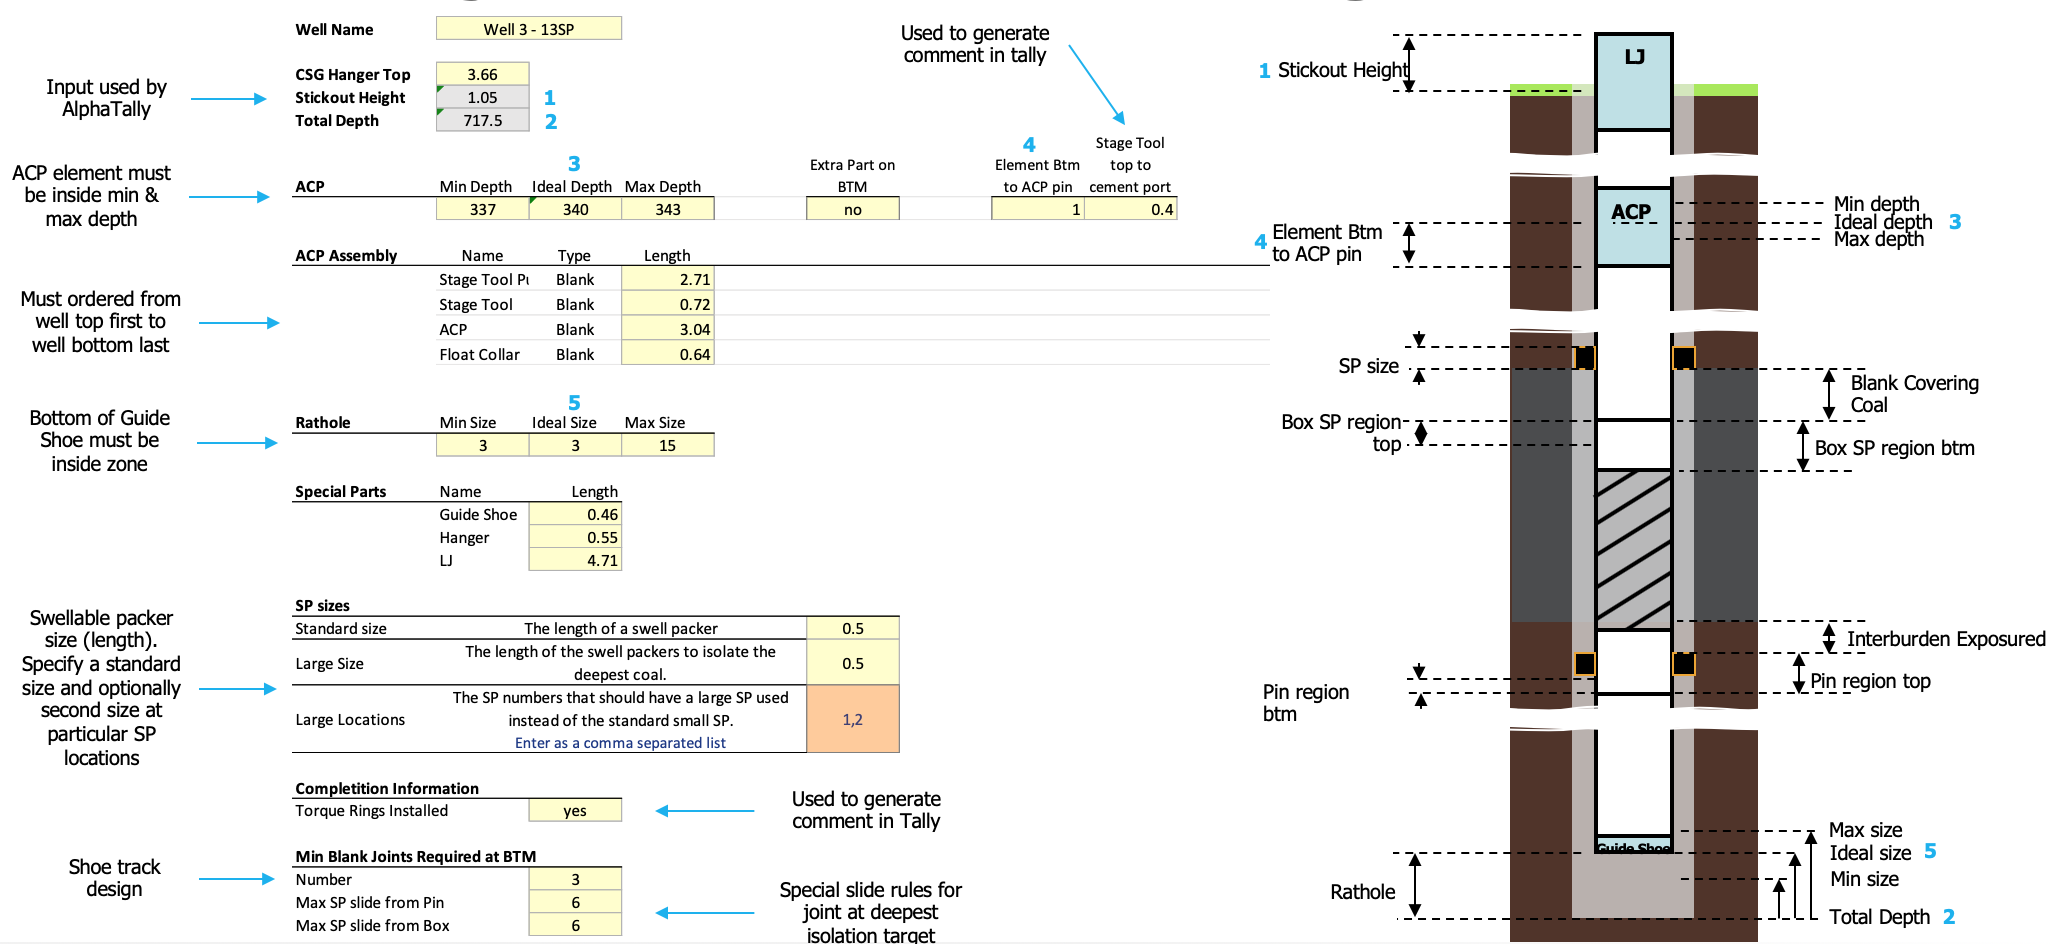
The Main sheet requires input of the completion design specification. This should be filled out according to the diagram below. This sheet may look slightly different depending on the version being used. Furthermore, Endla has designed specific input sheets on the request of certain operators, so there may be some discrepancy from the example shown below. However, the concepts remain the same regardless of which version is being used.
Advanced Specifications
Inside the Advanced sheet, three primary sets of variables will be seen. As shown below, there will be a “scorer” section, a “completion information” section and a “part information” section.
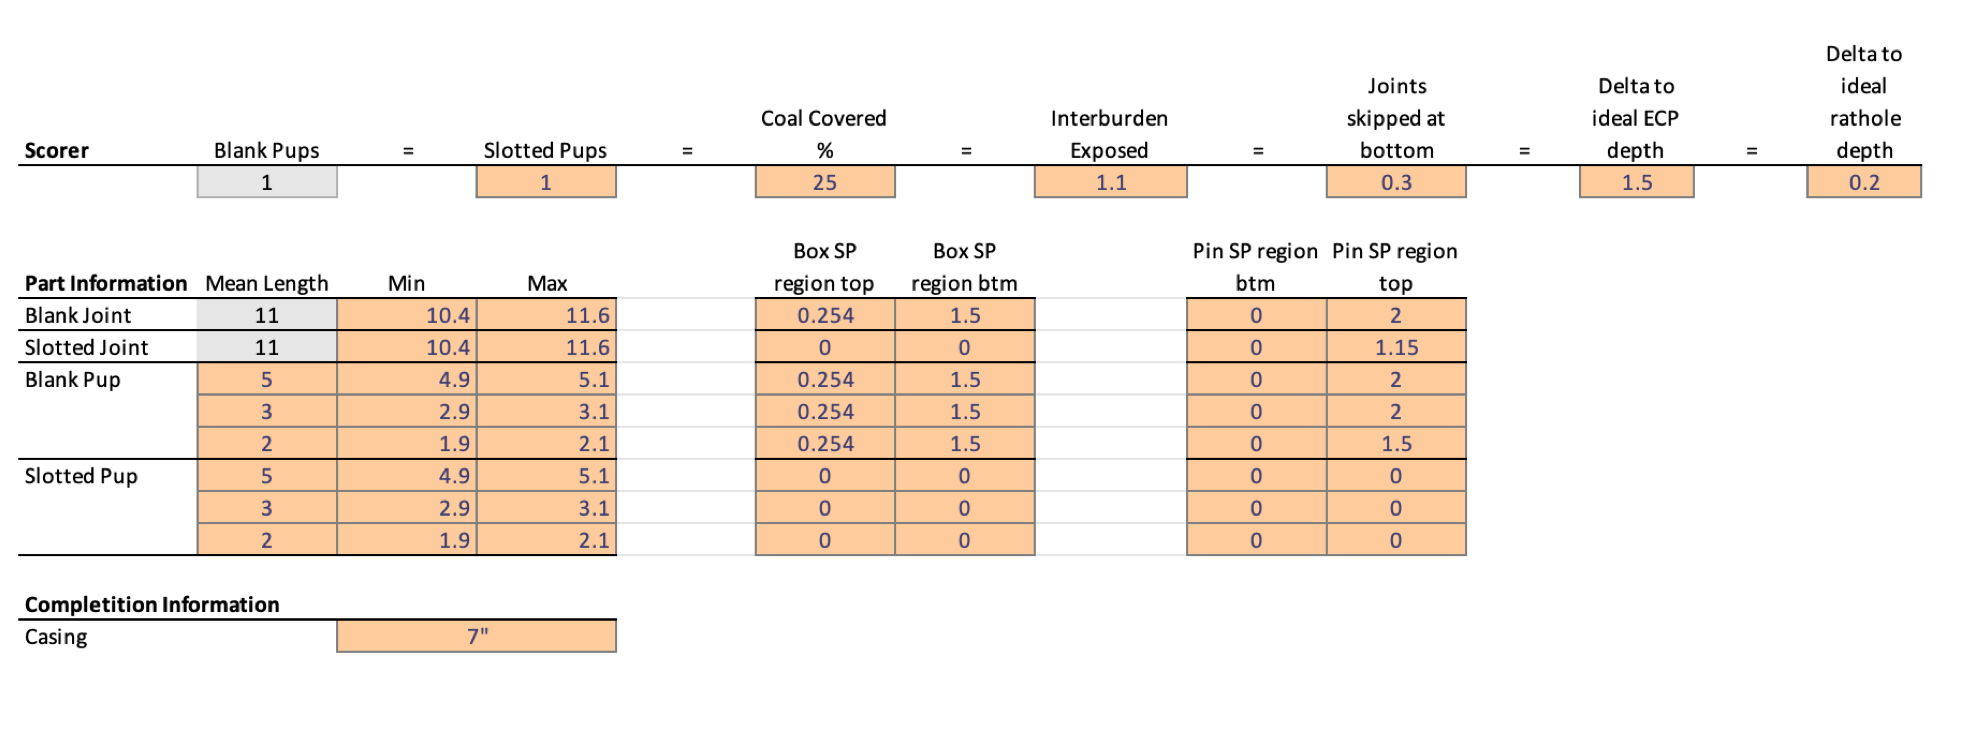
Both the part and completion information sections should be filled out according to the equipment available for the well. In this example, there is information for blank and slotted joints of four sizes: the 11m standards, 5m pups, 3m pups and 2m pups. The completion casing size should also be input into the completion information section.
Unlike the other sections, the scorer is based on how the well should be designed, as follows:
- Aside from the “coal covered” input, the numbers assign a weight to the variable above them
- the weighting is based on an inverse coefficient, so the smaller the number the greater the importance given to that variable.
- This is done so the statement becomes an equivalence ie 1 blank pup = 1.5m delta to ECP in the above example means that if using one extra pup reduced the delta to ECP by more than 1.5m then that extra pup would be used because it would reduce the score.
- for example, if the number underneath “blank pups” is decreased the system will increase the weighting on blank pups. This will result in blank pups being preferentially used less where possible.
- In another example, the greater the number associated with the “delta to ideal rathole depth” the less AlphaTally will try to match the designed rathole depth to the ideal rathole depth.
- The scorer functionally works by assigning the coefficients in the following pseudo formula, which is minimised by AlphaTally when looking for the most optimal solution
- Score = sum(incidence value/coefficient)
- Where the coefficient is the value assigned in “advanced”, incidence value is the value taken from the proposed tally (e.g. number of pup joints or distance from real ECP height to ideal) and the sum is taken across all values present in the scorer.
Isolation Ranges
In the Isolation Ranges sheet, the depths at which production zones will be isolated can be specified. These zones can come from the Endla Isolator tool, but also may be otherwise specified.
The design of this input is such that:
- above the ACP depth everything is isolated
- below the ACP everything is exposed unless isolated by an isolation range. This means that the deepest isolation must be from the bottom of the deepest production zone to TD.
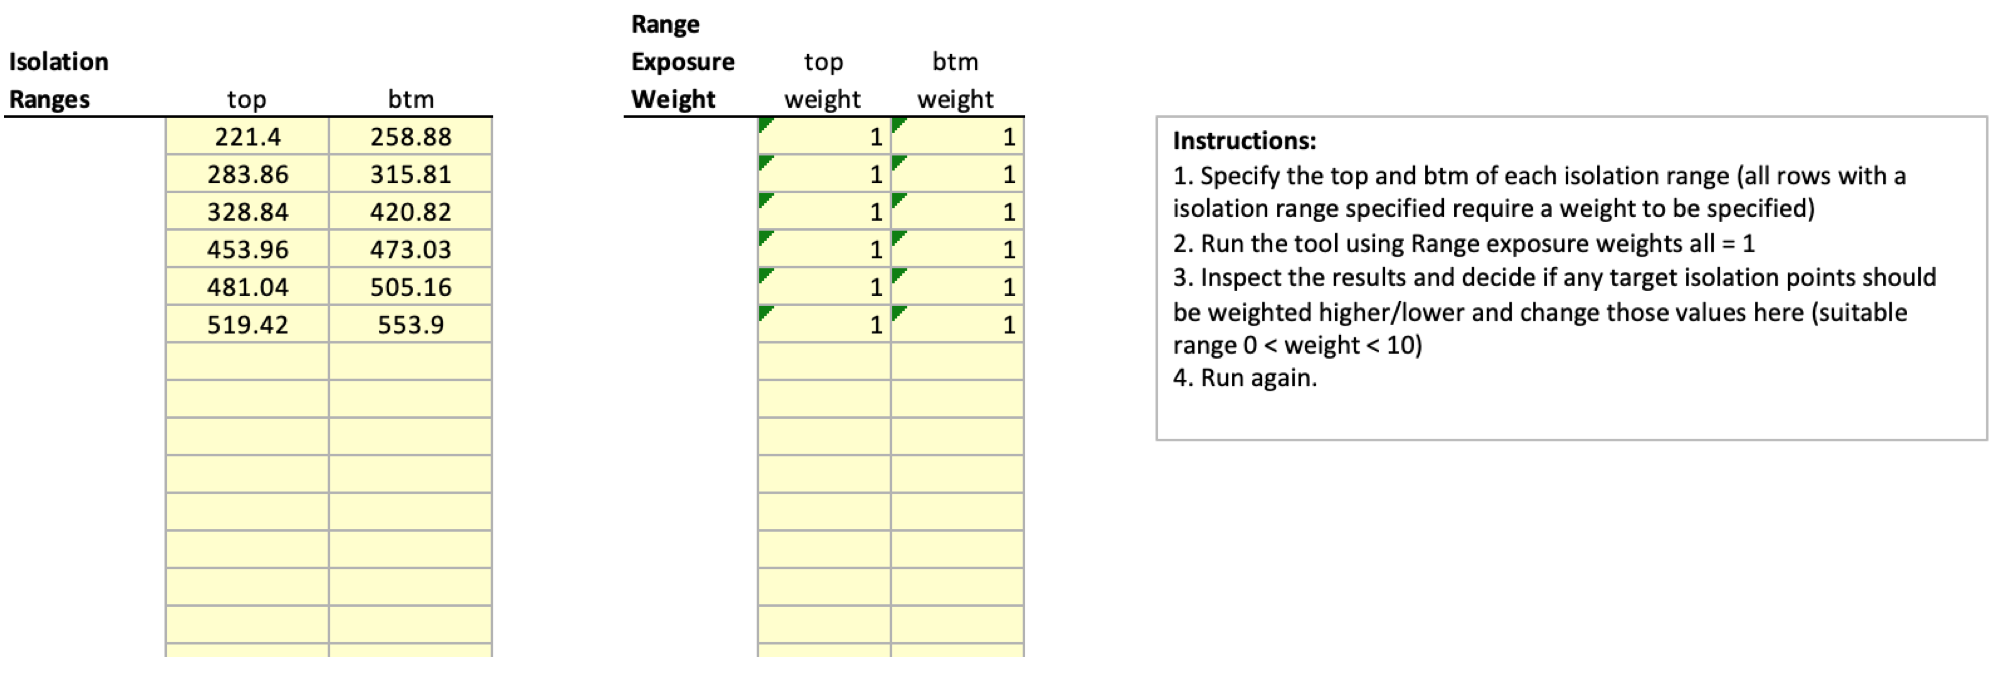
It is recommended that AlphaTally is initially run using all range exposure weightings equal to one. Once the first run is completed the weightings can be adjusted to prioritise the isolation around certain zones:
- The top and bottom weightings help prioritise zones for isolation
- The higher the weighting factor in this part of the spreadsheet the more onus will be placed to isolate that zone exactly
- if a zone with known high solids production is desired to be isolated, increasing the weighting factor associated with the top or bottom of that region will help isolate this region more tightly and reduce solids production
- An overall range of between 0 and 10 is recommended for the weighting in most scenarios
- A weighting of 0 would mean that AlphaTally only uses standard sized joints to isolate the zone, it would be as close as possible with full sized joints but pups would not be used
- A weighting of 10 would mean AlphaTally would use as many pups as required to get the isolated zone to the specified height or as close as possible
A video comparing the philosophy of weighting the bottom of an isolation range zero to a high weighting is shown below. It should be evident that construction of the tally differs significantly in resources used, in order to facilitate a tighter isolation range:
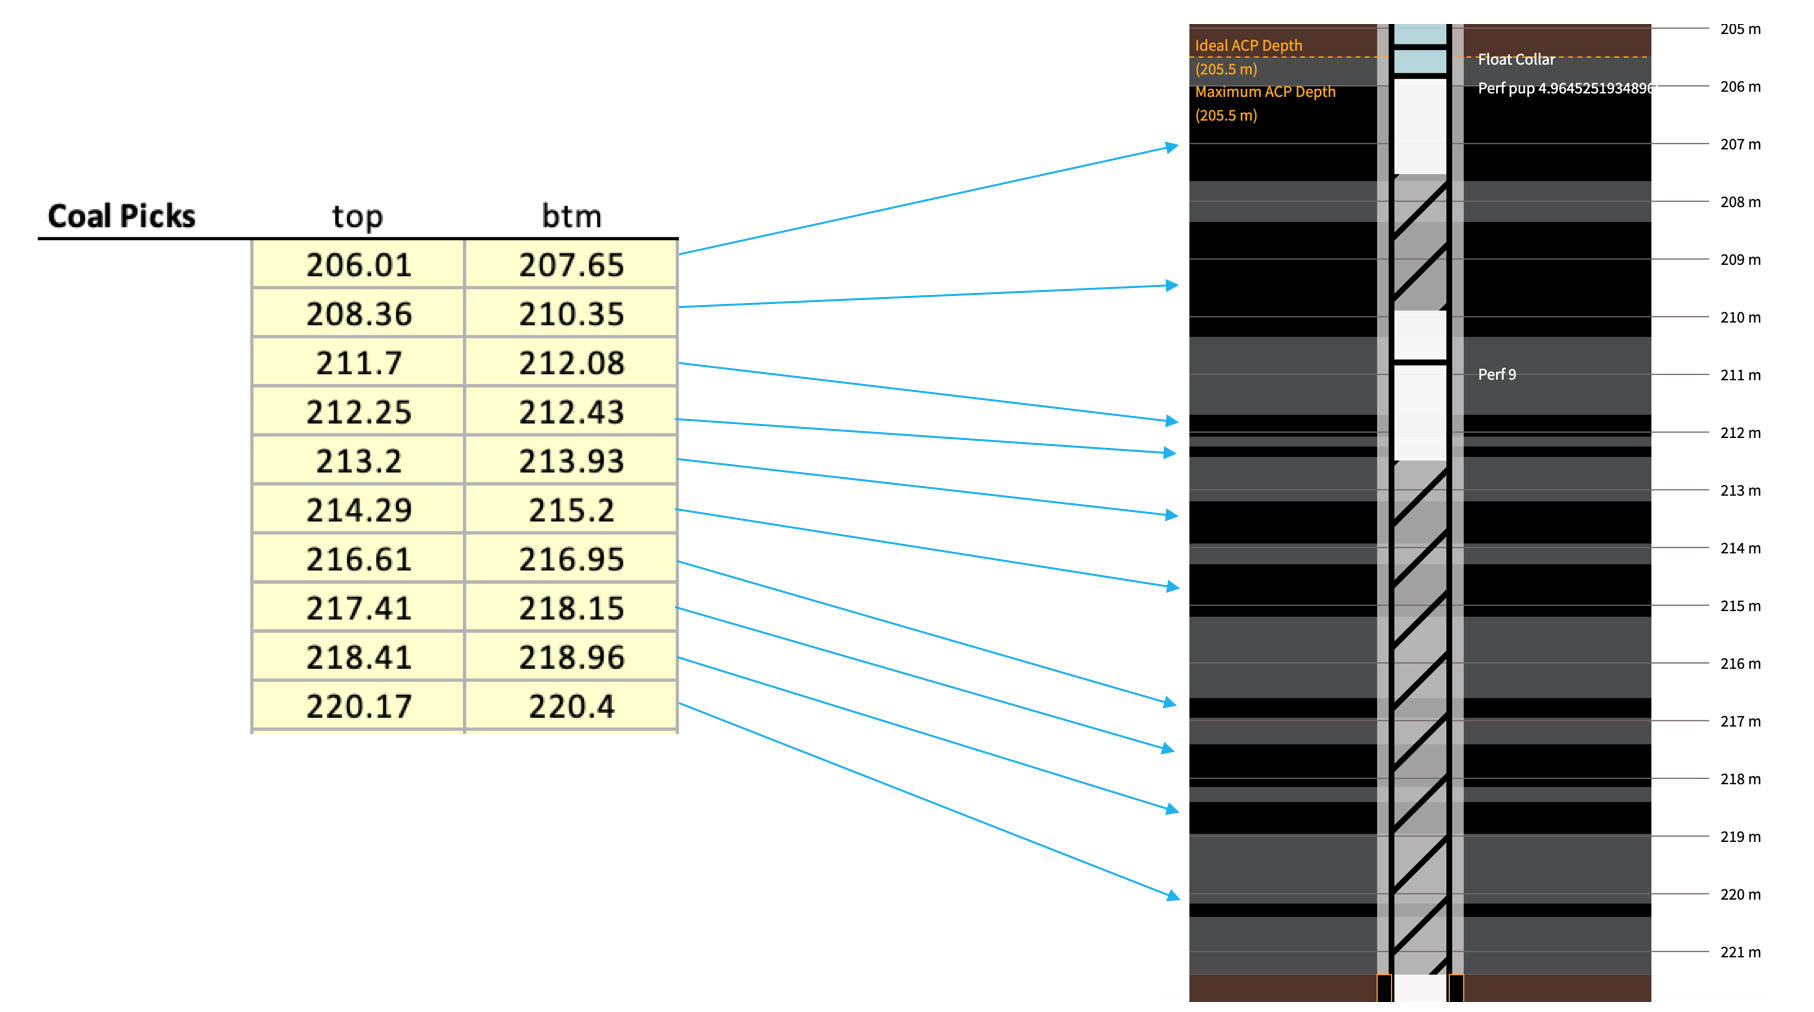
Coal Picks
As the name suggests, the coal picks from the Isolator tool or elsewhere should be entered into the spreadsheet on this page. This allows AlphaTally to display the picks in the generated subsurface diagrams and calculate the exposure percentages.
Casing Inventory Input
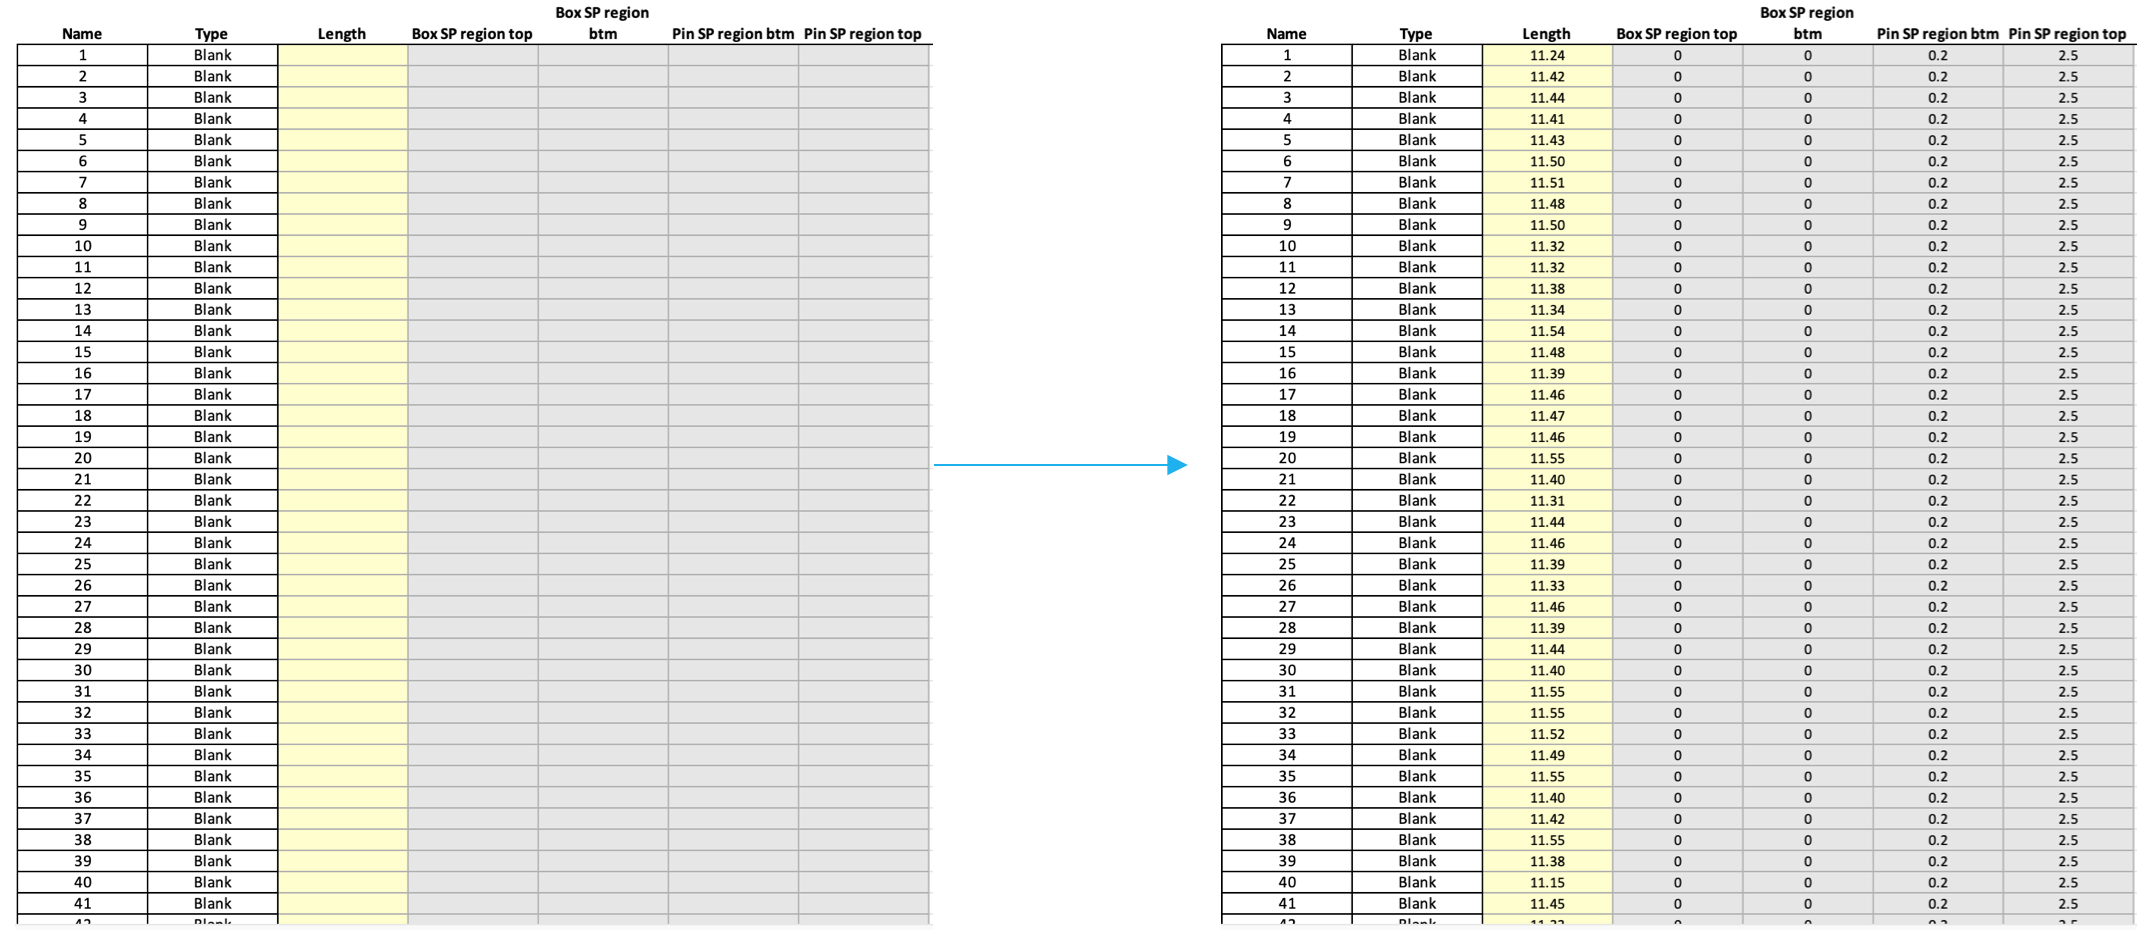
- Four input sheets: “Blank Joints”, “Slotted Joints”, “Blank Pups” and “Slotted Pups”
- For each of these input sheets the input process is the same, with the exception that for “Blank Joints” and “Slotted Joints” the items must be named by numerical running order (e.g. 1, 2, 3, 4)
- lengths of the joints should be input to the yellow column.
- Any specific item names for the pup joints should also be input
- ensure the correct type of joint is selected, either “blank” or “slotted”
- Once the joint lengths have been input, the right-hand side of the table will generate based on the part information input on the advanced sheet, you can edit this information row by row if required due to a part defect on a particular part limiting the region a swellable packer can be placed on it for example
- A message will appear if the casing length is outside the expected values as a recommendation to check the input is correct
ACP Assembly Stock
The ACP Assembly Stock sheet provides a database of the ACPs available. The COC SN cell on the main page references this list then checks the ACP measurement numbers provided against list. If the serial number (SN) is not found in the database, the average is taken and used for these comparisons. This process of checking is done in order to avoid any mistakes as the ACP is an important part of the completion which cannot be subject to error.
Input Base Tally
The Input Base Tally sheet is used to make manual changes to AlphaTally’s produced design. The recommended first step is to run AlphaTally without anything in this section. However, if the casing design is known at least up until the depth at which the manual change is required then no prior run is required. AlphaTally’s base tally functionality can be used as follows:
- Please note:
- Casing tally is in running order (deepest casing at start of tally)
- The base tally must contain either all or none of the ACP assembly
- The comments are not used as inputs
- Base tally will currently not modify the starting joint part number automatically to finish with joint #1
- Input casing tally
- Manually make changes where required
- Delete everything deeper than the deepest change you made
- Check deepest change is on row 2 of Excel sheet
- Re-upload the input sheet to AlphaTally
- Re-run AlphaTally
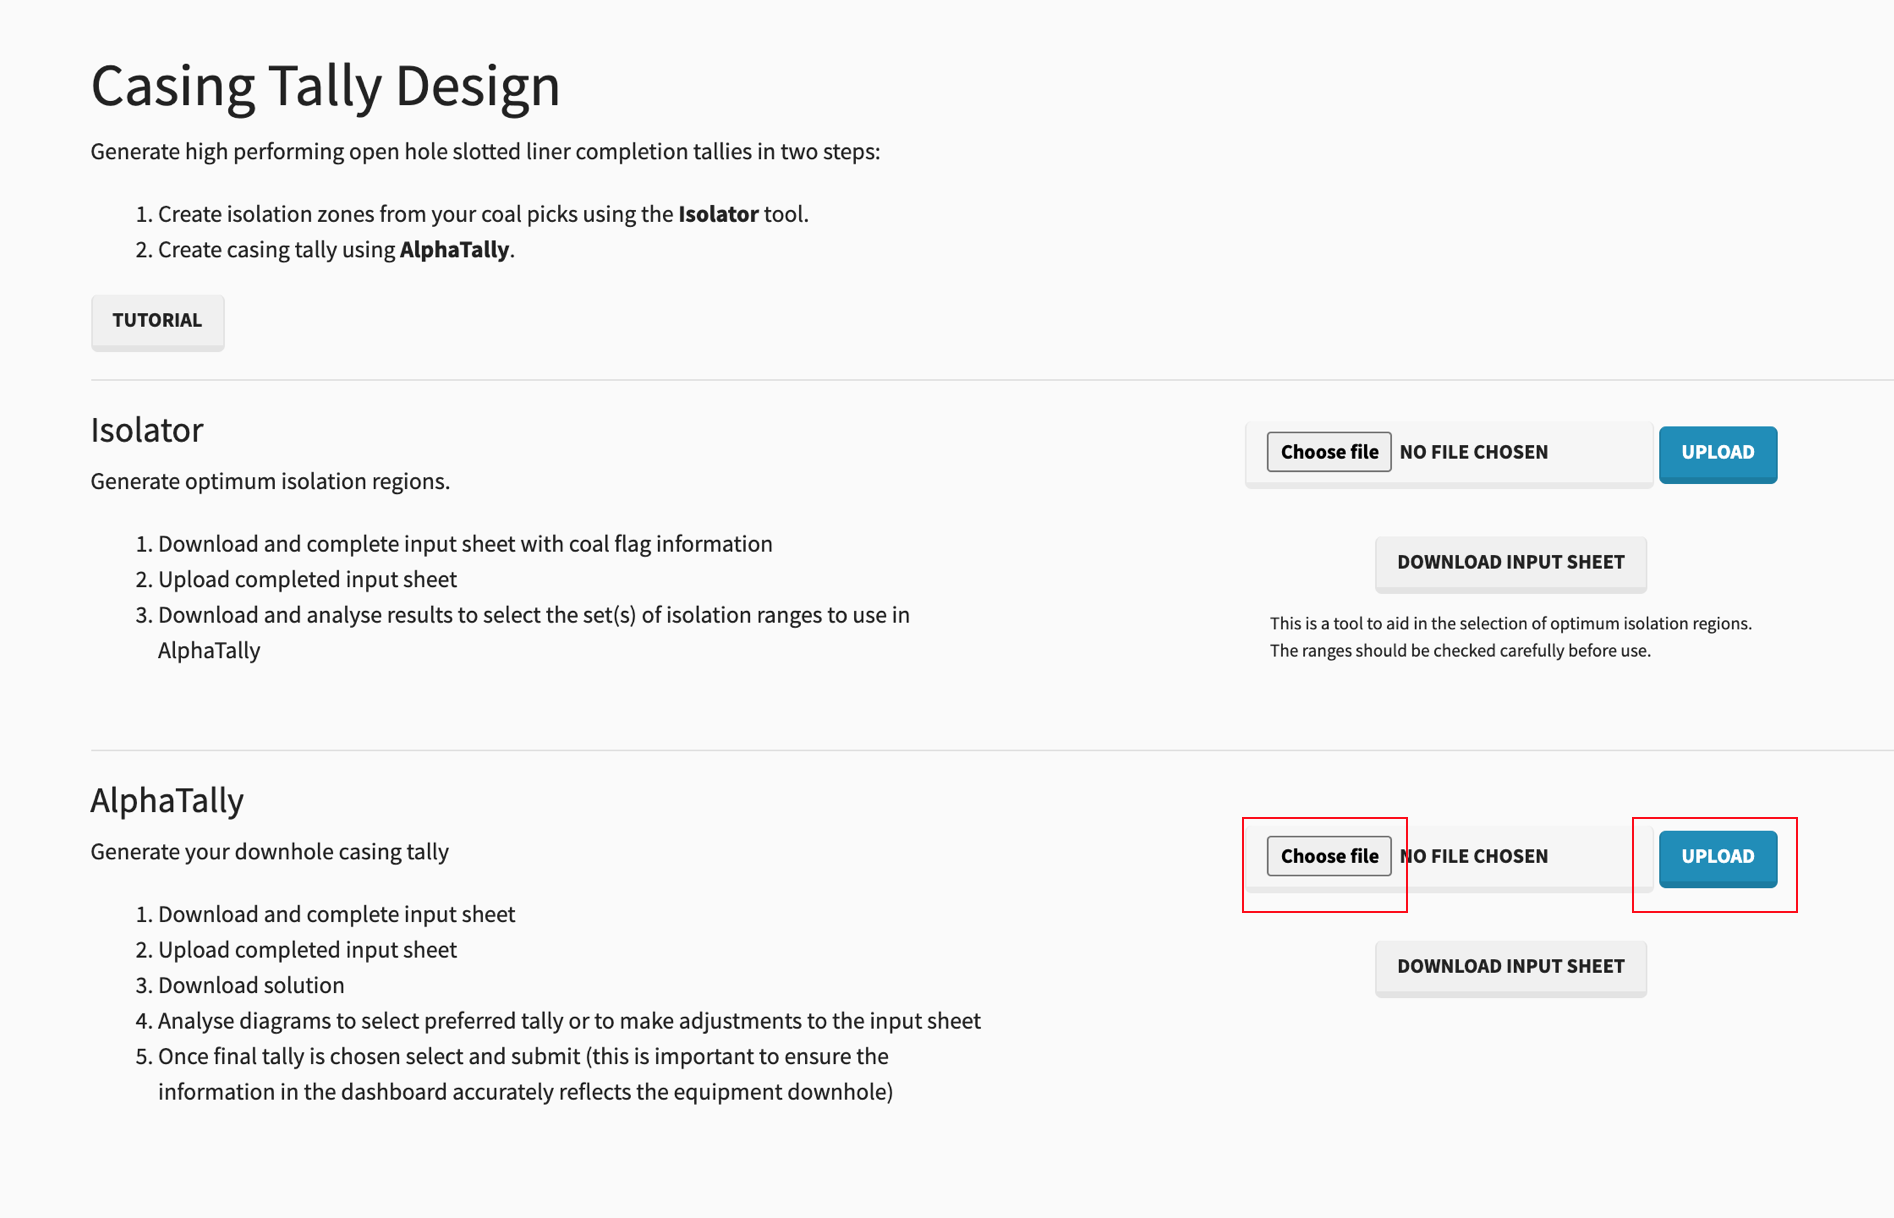
Uploading to AlphaTally
Once all the required data has been entered, the input file can be uploaded on alphatally.endla.com.au. This can be done using the “choose file” and “upload” buttons:
Initial Output
When the completed AlphaTally input sheet is uploaded, the program will run and you will see the following pane:
Tally Diagrams
If the “View Solutions” button is pressed after AlphaTally has been ruan, the casing diagrams are shown, as below:
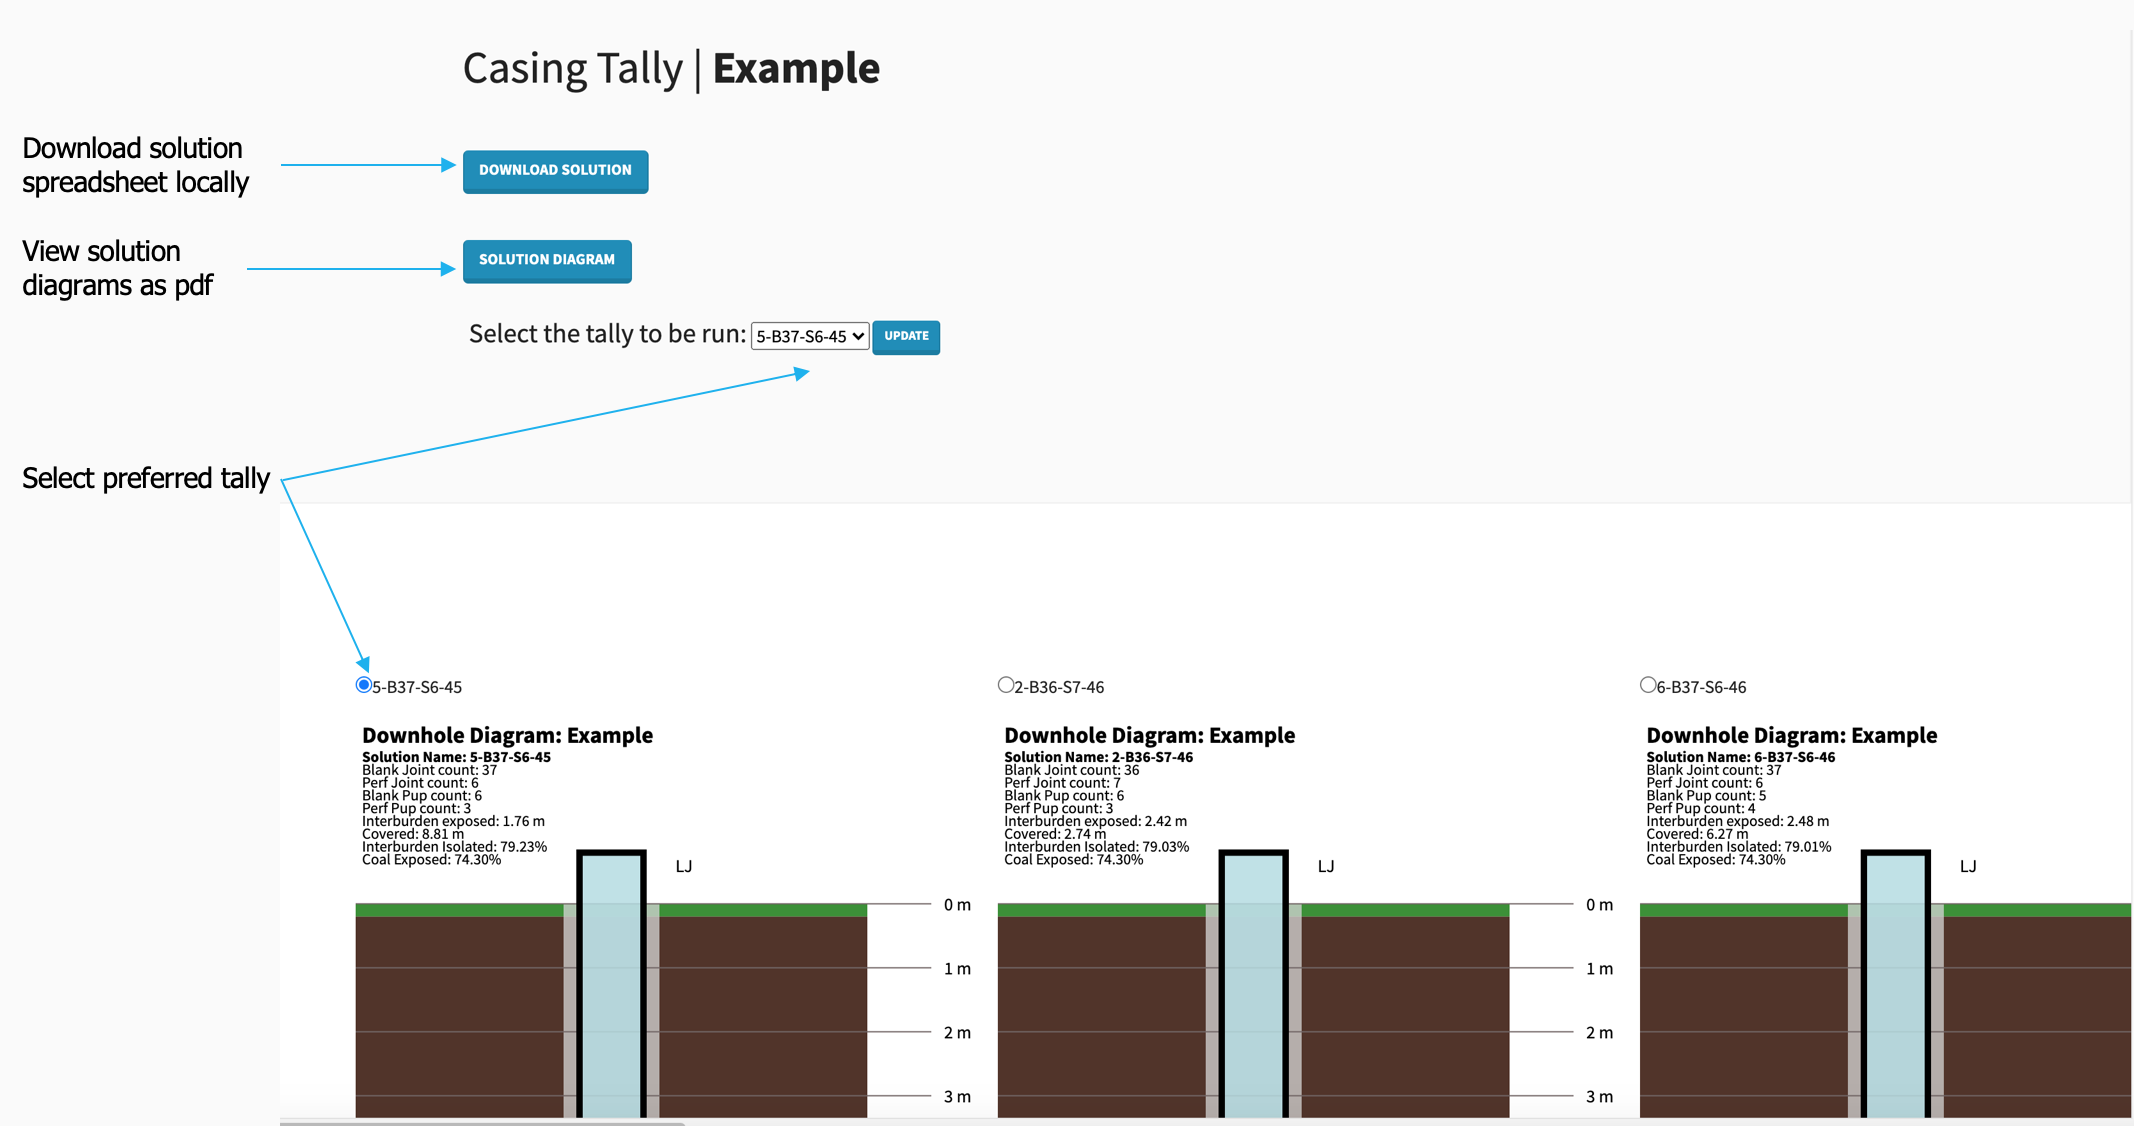
- Scroll sideways and down to inspect all casing designs
- Select your preferred tally, submit it and then hit “download solution”. The purpose of selecting and submitting a tally is so the data in the dashboard reflects the installed solution. If no tally is selected then the dashboard assumes you chose the lowest score option
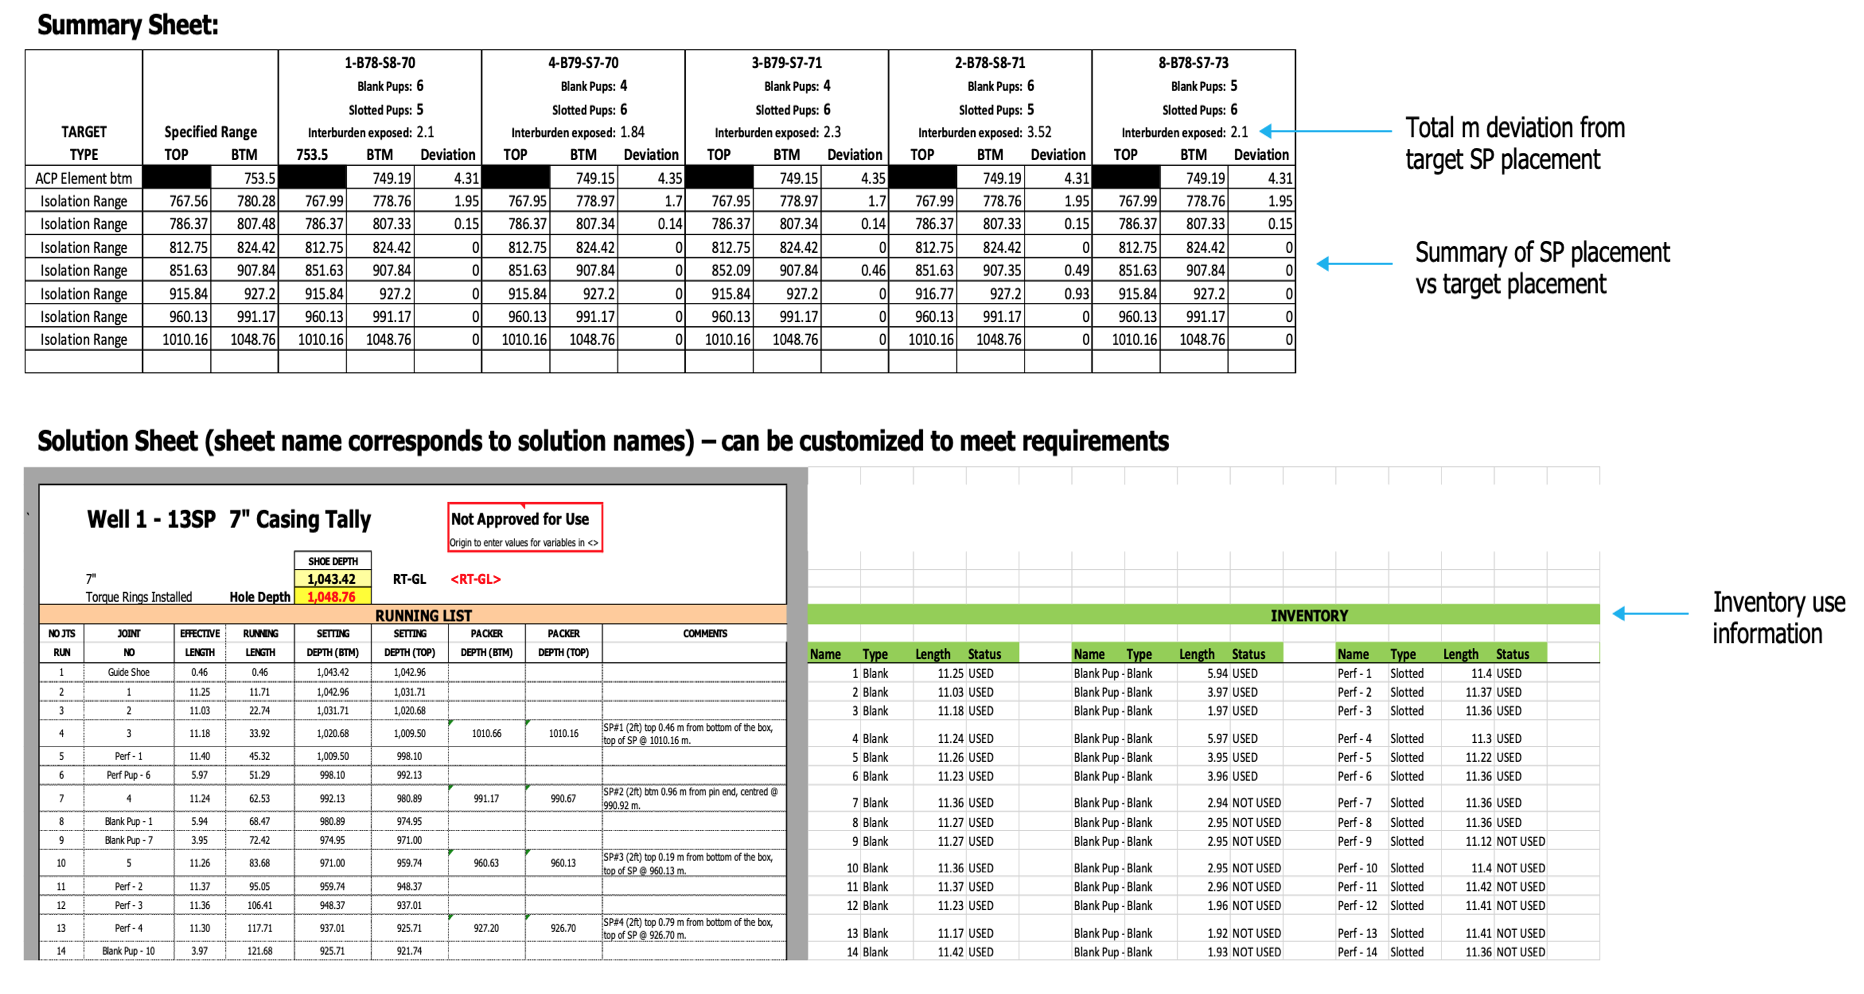
Final Casing Tally (Excel)
Once the solution spreadsheet has been downloaded, if opened you will see both the summary and the solution tabs. These are laid out as follows:
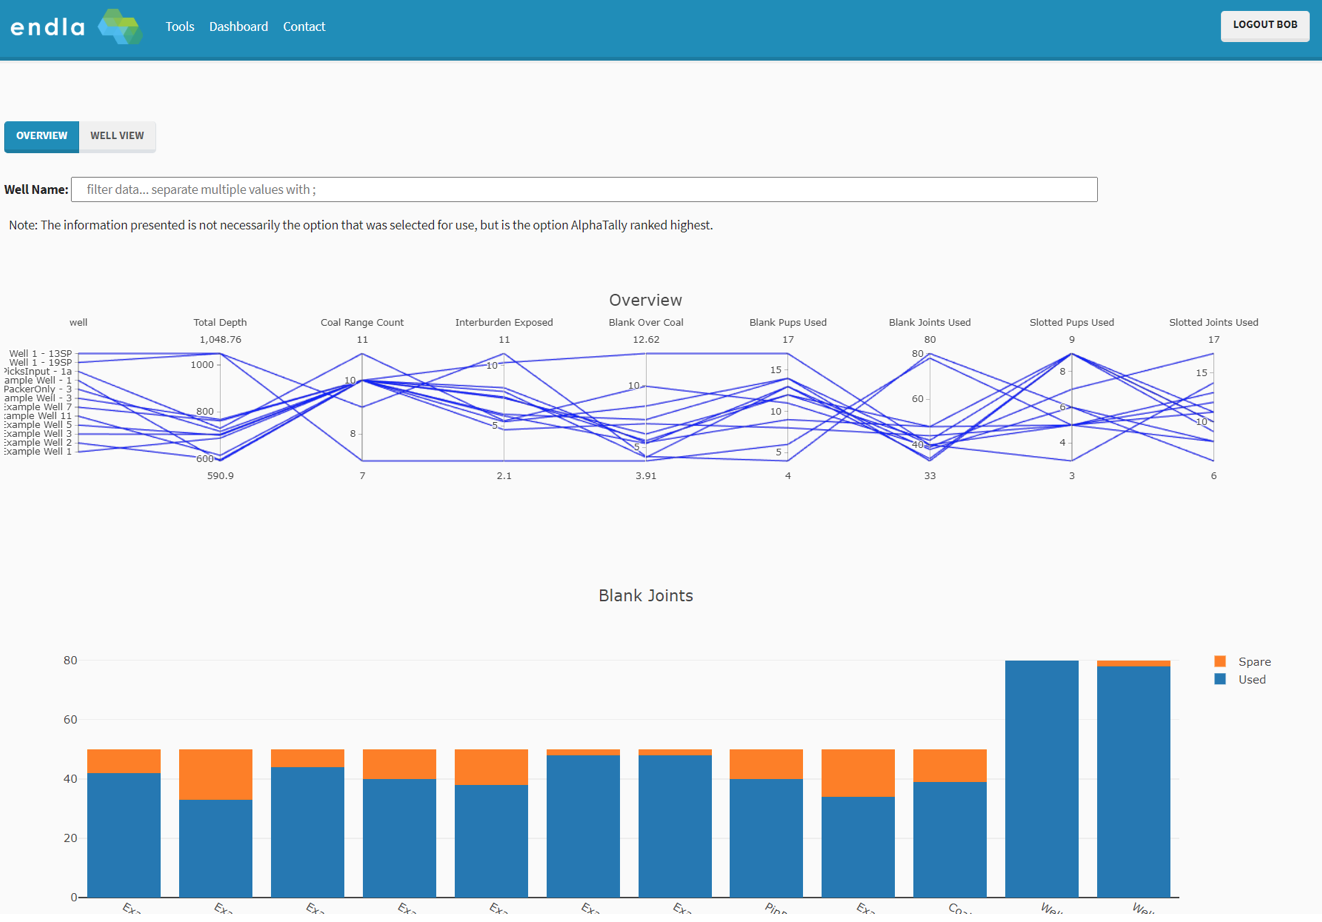
AlphaTally Dashboard
The AlphaTally Dashboard lets the user quickly compare and inspect all well designs which were selected and then submitted on the tally diagram page. There are two views in the dashboard:
- Overview:
- Overview of all wells
- Dynamic graphs and filtering
- Analyse trends to identify inventory requirements for example
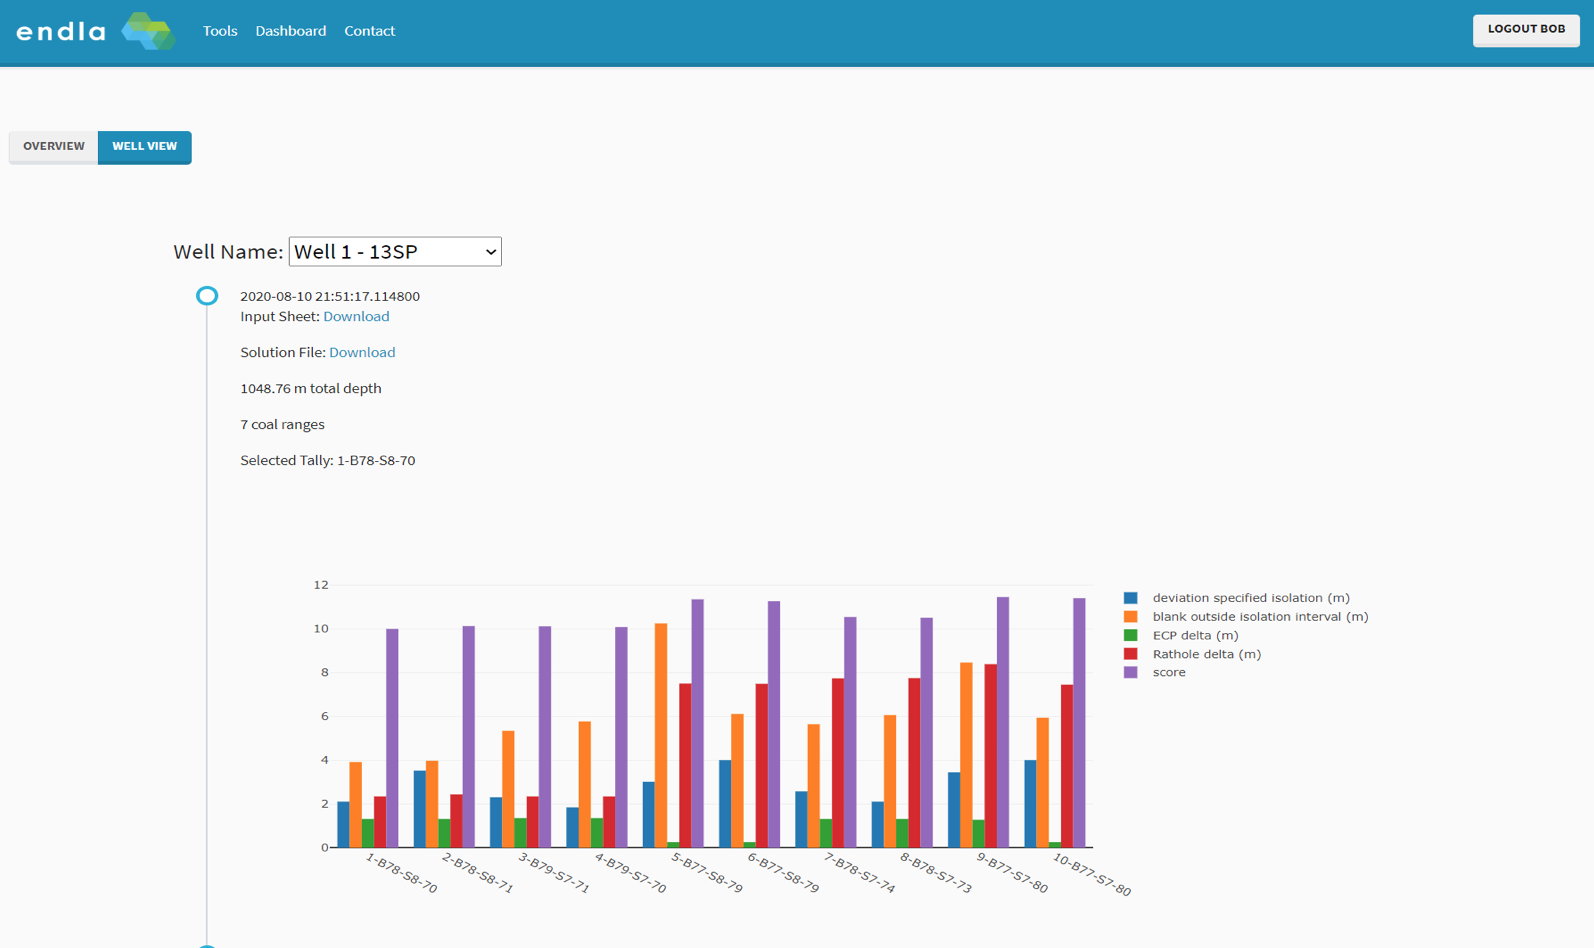
- Well View:
- Review a well in detail
- Download the input sheet uploaded
- Download the output sheet